Thursday, October 11, 2012

Random Acts of Kindness


I recently read a blog post about a woman named Marsha who spent her 40th birthday doing 40 random acts of kindness. I think what she did was amazing and of course, I was inspired to do something, but on a much smaller scale (perhaps when I turn 40 I’ll steal her list and do them all!). A few weeks ago our grill caught on fire and I, to my husband’s embarrassment, overreacted and called 911. The fire department was here in a jiffy and while our dinner was ruined, our house was thankfully not.  
   
One of the random acts of kindness performed by Marsha was by taking cookies to her local fire department, so I thought I would start there. I had been meaning to try a new cookie recipe, and figured this was the best time to do it. M didn’t have school on Columbus Day so we set to work baking and later on, the boys (dressed up in their cute firemen outfits) accompanied me to the fire station to drop off our cookies.


The fire fighters were very excited to see the boys, gave us a tour of the fire house and even allowed them to climb onto the fire truck and the ambulance. We hope they enjoyed the cookies as much as we enjoyed baking them. To all the fire fighters and other emergency workers out there we say, in M’s words, “thank you for keeping us safe!”


Chewy Peanut Butter Chocolate Chip Cookies

Ingredients:
2 cups all-purpose flour
½ cup butter, softened
1 cup smooth-style peanut butter
1 ½ cups semi-sweet chocolate chips
1 cup packed brown sugar
½ cup white sugar
2 tablespoons corn syrup
2 tablespoons water
2 teaspoons vanilla extract
1 teaspoon baking soda
½ teaspoon salt

Preheat oven to 350 degrees. Combine the flour, baking soda, and salt; set aside.  Cream butter, peanut butter, brown and white sugars together until smooth.  Beat in eggs one at a time, then stir in corn syrup, water, and vanilla. Stir flour mixture into the peanut butter mixture and fold in chocolate chips. Drop by tablespoonfuls onto ungreased baking sheets, about an inch apart. Bake for 9-10 minutes in preheated oven, or until edges are golden brown. Let cookies cool for 1 minute on cookie sheet before transferring to wire racks to cool completely.

Recipe yields 5 dozen cookies.

Original recipe from Allrecipes.com, with modifications 

Wednesday, October 10, 2012

Elmo's (pretzel) crayons

As I mentioned before, I LOVE planning birthday parties and can spend hours looking for ideas online. The idea for J's 2nd birthday party came from Our Best Bites shortly after we celebrated his first birthday. I saw these edible crayons and immediately fell in love with them; I knew I wanted to make them, just needed an excuse. 


I settled on a Crayola theme for his birthday a couple of months ago and had been planning on using a combination of red, yellow, green and blue for all his other decorations. J loves Elmo and while watching Elmo's World one day I got the idea to tie Elmo and the Crayola theme together, since one of Elmo's favorite things is crayons!

I found a lot of cool ideas on Pinterest, but the hit of the party was definitely the crayons! While I originally found them on Our Best Bites, a quick search took me to a post by nickwilljack with clear instructions and a PDF file of the crayon wrappers. I didn't want to buy a huge pack of colored paper, so I just had copies made at Staples of the different colors I needed.

I used my trusty paper cutter to cut the labels and decided on using honey wheat pretzels so I wouldn't have to cut the pretzel rods. I personally would've preferred the salty-sweet combination of the regular pretzel rods, but my guests didn't seem to mind and really enjoyed this combination 


I started by melting the different colored Candy Melts in the microwave. To avoid ugly white splotches on your candy, add a couple of fresh candy discs to your melted chocolate and stir (something to do with melting them at high temperature) or melt them using the stove-top method. Dip one end of the pretzel in the melted candy and swirl it around. Dip the other end and place the pretzel on any flat surface covered in wax paper. Let them dry before moving on to the next step.

Cut a piece of clear tape (about an inch and a half) and place it at the end of the wrapper, making sure that only half of it is on the paper, lengthwise. Roll wrapper over pretzel and secure with the half of the tape that's off the paper.


While making these was a bit time-consuming, once I started doing it and figured out a system it really wasn't difficult to do. Seeing how much everybody loved them definitely made them worth the effort!


Our little J's 2!

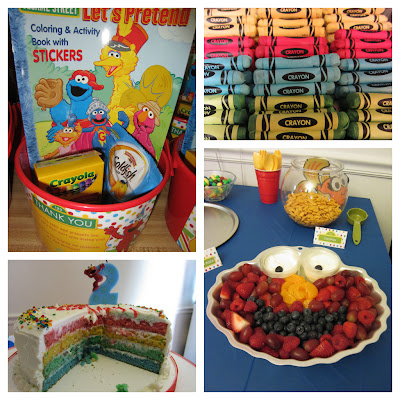
We recently celebrated our little J's 2nd birthday and I have to say, this was by far the most prepared I've ever been. A few of the guests commented on how well everything went and how hard it was to believe that there were 10 little ones (plus parents) crammed into our townhouse, because there was almost no fighting and no tears! The youngest guest was just over 1 and the oldest child was our other munchkin who's 5, but most of the kids are around J's age or a little bit older. 

I love planning parties and this one was a year in the making! While browsing recipes on Our Best Bites, I ran across these adorable crayons made of pretzels and Candy Melts and then and there I decided what Jacob's 2 year birthday theme was going to be! After a lot of time spent on Pinterest, the theme evolved into Elmo (because "Elmo loves his goldfish, his crayons, too...) and it was so much fun to plan! Inspiration for these ideas came from a lot of different blog posts.
The party was from 10:30 am to about 12:30 pm, so we had several snacks on hand as well as cheese and pepperoni pizza for lunch. The menu included Goldfish crackers, cut up veggies and Ranch dip, candy-covered pretzels (that would be the crayons! Instructions to come), peanut M&M's, fruit and vanilla yogurt, plus the pizza and assorted drinks for the kiddos and their parents. I made a four-layer rainbow cake using Pillsbury Funfetti cake mix and vanilla icing with sprinkles, as well as a dozen cupcakes. I made the cake based on this post, but used regular food coloring and used a cake leveler to keep the layers flat.

The favor containers were little red buckets that I found at Target (they also sell them at Party Depot) and I glued on a Thank you photo card that came with the invitations I purchased from Etsy. The goodies included a coloring and sticker Sesame Street book, 24 box of crayons (I bought these over the summer when Toys R Us had them at 4/$1!), Goldfish cookies, glitter Elmo stickers and a rainbow mini lollipop. 

Since most of the guests were toddlers, I kept the entertainment simple. I blew up some balloons and let them loose around the house, surprisingly kept the kids entertained throughout the party! I also had a couple of children's tables set up with play-doh and alphabet cookie cutters, as well as our Step2 2-sided easel that had chalk on one side and magnetic letters on the dry-erase side. I covered our coffee table with a piece of white paper from a paper roll, put out crayons and Sesame Street birthday coloring pictures from a book I found at the Dollar Tree. That's it! So simple, yet it kept the kids happy and busy while the parents were able to chit-chat and visit with the other grown-ups.

Happy birthday to our little chunky monkey and thanks to all our friends and family who celebrated with us!


Tuesday, October 9, 2012

Crockpot Beef and Broccoli


(Originally written for Real Housewives of Northern Virginia blog)
I have always considered myself to be technologically savvy and up-to-date with most trends. It really was surprising that my love affair with Pinterest took some time to develop; it progressed slowly and developed similarly to the Elisabeth Kubler-Ross’s 5 stages of grief (can you tell I have a background in Psychology?). There was: 

  •  Denial – What is Pinterest and what is so great about it? Me join Pinterest? No way. I love Facebook and don’t need anything else in my life.
  • Anger – Why didn’t I start using Pinterest before my last party? It would’ve been so much better!
  • Bargaining – If only I had tried that recipe I found on Pinterest instead of making up my own…
  • Depression – All these people on Pinterest have such great lives and they can do EVERYTHING! They cook, they bake, they tackle DIY home projects, they spend time with their kids. I feel so inadequate!
  • Acceptance – I cannot attempt to recreate everything I pin (I spend WAY too much time on Pinterest and there aren’t enough hours in the day for me to do everything I wish I could), but I vow to at least try some of them out. 
I recently  finally decided to get off my butt try some of my pins out. I do not consider myself a professional “pinner; ” I am not a chef or incredibly crafty and my time-management skills are more than questionable. The way I see it is, more than likely, most of Pinterest users are like me. So here I am, just trying to make my life easier (and hopefully yours), one pin at a time!

Which brings me to this, my first “I pinned it!” post. A couple of weeks ago I found a Crockpot Beef and Broccoli recipe that I’ve been dying to try. The weather is finally turning, and while I wasn’t exactly wishing for another tornado watch/warning, this rainy day is perfect for a Crockpot meal! 

I’m relatively new to slow-cooking and I haven’t found many recipes that I really like, so while I was hoping this would be THE Crockpot meal to change my mind, my expectations weren’t high. This recipe is from BS Recipes. I read all the comments before I decided to make this and asked my butcher for a cut of meat that wouldn’t shred after being in the Crockpot all day. He suggested a shoulder roast, which is what I ended up using. I made some small changes, but for the most part stuck to the directions. My 5-year-old gave it two thumbs up and my husband ate two bowls of it! Here’s the original recipe:

Ingredients

1 pound boneless beef chuck roast, sliced 
into thin strips (I used about 1 ¾ pounds of the shoulder roast)
1 cup beef consomme
1/2 cup soy sauce (I used low sodium)
1/3 cup brown sugar
1 tablespoon sesame oil
3 garlic cloves, minced
2 tablespoons cornstarch
2 tablespoons sauce from the crock pot after being cooked
Fresh broccoli florets
Hot cooked rice (we’re brown rice lovers, so that’s what I used)

Directions
 

1. Place beef in a Crockpot.
2. In a small bowl, combine consommé, soy sauce, brown sugar, oil, and garlic. Pour over beef. Cook on low for 6-8 hours. (Mine was done in 4)
3. In a cup, stir cornstarch and sauce form the crock pot until smooth. Add to crock pot. Stir well to combine. (I used cold water instead of sauce)
4. Add broccoli to the crock pot. Stir to combine.
5. Cover and cook an additional 30 minutes on high (the sauce has to boil for it to thicken)*.
6. Serve over hot cooked rice.


* I transferred everything to the stove and boiled until sauce thickened. Add more cornstarch if needed.